Buying guide for best ice cream makers
Ready to buy now? Shop the best:
Expert Tip
Fat is flavor! Substituting lower-fat options, especially without adjusting other ingredients, reduces the flavor and can alter the texture. Less fat = more water = harder ice cream. This is why store-bought ice creams are so hard – they use a lot of water instead of dairy to reduce cost.
BestReviews Cooking and Baking Expert
When I was a kid, every summer my aunt would break out her old-fashioned ice cream maker that looked like a bucket with a hand crank. The results were cold and delicious, but the process seemed long and difficult.
Well, those days are over. With the latest ice cream makers, you don't have to wait too long — or give yourself a sore arm in the process. Whether you love ice cream or sorbet or Italian ice, you can have it all exactly how you like it with just the press of a button, saving you from spending money on overpriced ice cream around town.
Some machines are best for rich, creamy ice cream, some are best for soft serve. Finding the one that fits your cravings is paramount in order to deliver the at-home deliciousness you want.
We found that the Ninja CREAMi does the best job at handling whatever frozen dessert you want to create. From rich ice cream to a light, healthier fruit sorbet, you have options that are super simple to make.
Editors' picks
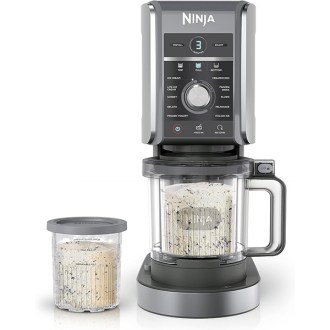
Ninja Creami
Editors’ Favorite
Churning Time: 2 min | Maximum Yield: 1 pint | Dimensions: 12.07" L x 6.52" W x 15.95" H | Weight: 13 lb | Ease of Cleaning: Pint containers, lids, paddle and press all dishwasher-safe
We tested the original Ninja Creami and couldn’t believe how easy it was to use compared to ice cream makers from other brands. “I have to say I was pretty impressed,” our tester said. “It seemed unlikely to me that I would get perfectly textured ice cream after such a short time — but the Ninja Creami proved me wrong.”
In addition to ice cream, it can also make sorbet, gelato, milkshakes, smoothies and light ice cream with the press of a button. And kids especially love getting creative with the Mix-in setting, which lets them blend in favorite toppings like Oreos and chocolate chips. Ice cream not soft enough after processing is complete? Just hit the Re-spin function to get a smoother, creamier texture. The Ninja Creami comes with two pint containers to store your batches in, and all its parts are dishwasher-safe, so cleanup is a breeze.
While it does take mere minutes to make the ice cream, the container of ingredients needs to go in the freezer for 24 hours before you can get started. “You’ve really gotta plan ahead in order to have ice cream on a moment’s notice,” our tester said. “But if you like frozen treats, I can see this saving money in the long run and adding some novelty and potentially healthier ingredient choices than what you would find at the grocery store.”
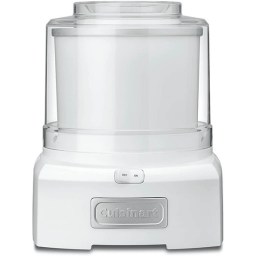
Cuisinart ICE-21 Automatic Ice Cream, Frozen Yogurt & Sorbet Maker
Great Value
Churning Time: 25 to 30 min | Maximum Yield: 1.5 qt | Dimensions: 9.5” L x 9” W x 11.25” H | Weight: 10.12 lb | Ease of Cleaning: The lid and mixing arm are dishwasher-safe, but the freezer bowl requires hand-washing
While the Cuisinart ICE-21 Ice Cream, Frozen Yogurt & Sorbet Maker is a fairly basic ice cream maker, we were able to consistently whip up delicious, creamy ice cream with it. A traditional ice cream maker, it comes with a freezer bowl that must be frozen for at least 16 hours. However, unlike other ice cream machines that typically come in neutral colors, the Cuisinart ICE-21 is available in a red option, as well as pink, so you aren’t stuck with a basic white.
It was extremely easy to set up during testing. "I didn’t even need to consult the manual to figure out how to work it," one of our testers said. We only needed three minutes to get it out of the box and assemble it on the counter in our testing area.
The Cuisinart ICE-21’s ice cream was the softest right after churning among the models we tested. We made a batch of chocolate and then a batch of vanilla that took 21 and 26 minutes, respectively, to reach a creamy, soft-serve consistency; neither batch was scoopable right after churning.
We were very pleased with the texture after placing both ice creams in airtight containers in the freezer for an hour and a half, which allowed us to scoop them easily. The machine didn’t take up too much space on the countertop in our testing area, and it weighs just about 10 pounds, so it would be easy to store in a cabinet and take out when you want to make ice cream.
Like similar ice cream makers, the Cuisinart ICE-21 is very easy to use, with a simple on/off button and a wide opening to pour your ice cream base through. "Even those new to using ice cream makers will find it simple and intuitive to use," our tester said. Additionally, it took us just seven minutes to clean all the components after making ice cream.
We give the ICE-21 an 8 out of 10 for its beginner-friendly design and consistent churning results.
Ninja Swirl
Best for Soft Serve
Churning Time: 3 to 5 min | Maximum Yield: 1 pint | Dimensions: 15.5” L x 10.03” W x 17.51” H | Weight: 20.8 lb | Ease of Cleaning: Pint containers, lids, paddle and press all dishwasher-safe
The original Ninja CREAMi revolutionized ice cream-making at home, but the Ninja Swirl increases that versatility with six additional soft-serve settings for a total of 13 one-touch programs. In addition to the classic ice cream, gelato, milkshake, light ice cream, sorbet and yogurt, it can make traditional soft serve, light soft serve, protein-packed soft serve, fruit whip, frozen yogurt and frozen custard. Like the original, you can use the Mix-in setting to blend candy, nuts, fruit and other add-ins into your classic recipes.
As with the original model, this ice cream maker requires freezing your ingredients for 24 hours before churning. It can produce a pint of ice cream at a time, but it includes two pint containers, so you can have two pints ready for churning at a time.
You can let your kids get in on the fun, too. The machine’s soft serve handle offers three speeds, making it easy to swirl your favorite flavors into a cone just like an ice cream shop. Cleanup afterward is also a breeze because the Swirl’s pints, lids, mixing paddle and swirl press are all dishwasher-safe.
Ninja CREAMi Deluxe 11-in-1 Ice Cream Maker
Best for Families
Churning Time: 2 to 5 min, depending on program | Maximum Yield: 1 pint | Dimensions: 12.01” L x 8.42” W x 16.69” H | Weight: 14.44 lb | Ease of Cleaning: Dishwasher-safe components
Like nearly all ice cream makers, the Ninja CREAMi Deluxe can whip up ice cream, sorbet, gelato and frozen yogurt — but then, it goes even further, making specialty treats like protein-rich light ice cream and Italian ice, as well as drinkable treats like milkshakes, slushies and frozen drinks. Its 11-in-1 functionality makes it the most versatile model we tested, so it’s an ideal option if you want to leave your ice cream maker out on the counter and get as much use out of it as possible.
Unlike other traditional ice cream makers, it does take some pre-planning the day before. Instead of freezing a bowl and pouring chilled ingredients into it, it requires freezing the ice cream base ingredients for 24 hours before churning. Though it eliminates any spontaneity, it drastically reduces the processing time.
How long it takes to churn varies based on the program chosen, but it took us just five minutes to make vanilla ice cream and seven minutes to make cookie butter ice cream when we tested, compared to the usual 20-plus minutes with other models. One of our testers noted, "I like that the display counts down the processing time for each program, so I knew how long each recipe would take to finish."
Testing also revealed that freezing the base ingredients before churning gave the vanilla ice cream a much more scoopable texture than the ice cream we made in other machines. It was firmer than soft serve right after processing and maintained that texture even after storing it in the freezer overnight.
The CREAMi Deluxe also offers some handy features to improve your recipes. For instance, our cookie butter ice cream was slightly crumbly after its initial processing, but when we used the convenient Re-spin feature, it remixed the ice cream to give it a smooth, creamy texture. We also used the Mix-in setting to incorporate crushed cookies into the cookie butter ice cream and were impressed with how well the CREAMi Deluxe blended the pieces throughout the dessert.
Other cold treats that we made were delicious, too. Our pineapple sorbet and lemon Italian ice both had a smooth, scoopable texture. "I was pleasantly surprised by how similar they were to store-bought versions," one of our testers said. And our blue raspberry slushie had an icy but still fluffy texture that was easy to sip through a straw, too.
One issue we ran into with the CREAMi Deluxe was its size. It’s fairly narrow but pretty tall. Our testing area had low-hanging cabinets, and it didn’t fit beneath them. It's also quite loud when you run the machine.
Overall, we gave it a 10 out of 10 for its impressive versatility, excellent texture, user-friendly design and consistency across all the desserts we made.
Cuisinart Pure Indulgence 2-Quart Automatic Ice Cream Maker
Easy to Use
Churning Time: 25 to 30 min | Maximum Yield: 2 qt | Dimensions: 11.25” L x 8.25” W x 11.5” H | Weight: 13.4 lb | Ease of Cleaning: The lid and mixing arm are dishwasher-safe, but the freezer bowl requires hand-washing
The Cuisinart Pure Indulgence Automatic Ice Cream Maker is a traditional option that delivers consistent results for ice cream, frozen yogurt, sherbet, sorbet and frozen drinks. Unlike the Ninja CREAMi Deluxe, which requires freezing your ice cream base before processing, it has a bowl that must be frozen before churning chilled ingredients.
During testing, we made one batch of ice cream with the bowl frozen for just six hours and another frozen for 24 hours. When we gave the bowl a full day in the freezer, we wound up with much thicker, firmer ice cream that didn’t melt as quickly. With the bowl frozen for six hours, our ice cream was thinner and melted faster. While their churning times were similar, the batch in the bowl that had been frozen for 24 hours only took 25 minutes, while the batch in the bowl frozen for six hours took a full half hour.
Overall, we were pleased with the texture of all the desserts we made during testing. We prepared a simple vanilla ice cream and a cookies-and-cream ice cream that both had a soft-serve texture right out of the machine. We also made a blueberry sorbet with a similar texture, but we struggled a bit with vegan coconut ice cream we prepared using canned coconut cream, which didn’t freeze as well as the other recipes. If we wanted a firmer texture, we only had to place the ice cream in an airtight container in the freezer for an hour or two to make it more scoopable.
The Pure Indulgence is very easy to use, with a simple on/off switch to get things going. It was also quick and easy to hand-wash the components with a sponge, though the lid and mixing paddle are both dishwasher-safe. "Make sure the freezer bowl is completely dry before placing it into the freezer again," one of our testers said. "When it’s placed in the freezer, it should be wrapped in a plastic bag to prevent freezer burn."
We give it a 9 out of 10 because of its affordable price, simple, easy-to-use design and excellent ice cream texture for multiple recipes.
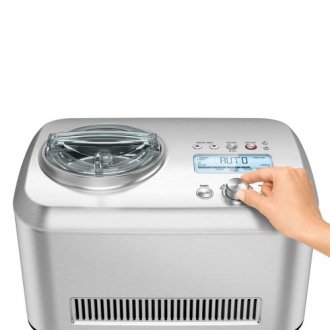
Breville Smart Scoop Ice Cream Maker
Best Compressor-Style Ice Cream Maker
Churning Time: 50 to 55 min | Maximum Yield: 1.5 qt. | Dimensions: 16.2” L x 7.2” W x 10.7” H | Weight: 30 lb | Ease of Cleaning: The paddle and lid are dishwasher-safe, but the ice cream bowl requires hand-washing
If you make ice cream regularly — or just want to whip up a batch whenever you want — the Breville Smart Scoop is the model for you. Unlike the other ice cream makers we tested, which all require freezing either the bowl or the ingredients themselves, it has a compressor that can chill the mixture, so you don’t have to prep beforehand. It even has a Pre-Cool function that we used to cool our mixtures before churning to reduce the overall processing time.
Though there's minimal prep required, its churning took longer than the other models we tested. It took between 26 and 52 minutes to churn the ice cream, depending on the setting we chose. However, the longer churning times are a fair tradeoff since we didn’t have to freeze anything ahead of time.
All the desserts we made had a nice creamy texture. We made vanilla ice cream, chocolate ice cream, mint chocolate chip gelato and lemon sorbet. The ice cream had a soft-serve consistency right after churning, while the gelato was slightly firmer and denser. We couldn’t scoop any of the recipes straight from the machine, but after an hour or two in the freezer, they were similar to store-bought ice cream in consistency.
We loved the Smart Scoop's Keep Cool feature. It can maintain the temperature of your finished ice cream for up to three hours. This kept our ice cream from melting or changing texture, so we didn’t have to worry about eating or serving it right after churning.
The Smart Scoop also features both automatic and manual settings for the ice cream’s hardness, so you can customize it to suit your preferences. We relied on the pre-programmed settings for ice cream, sorbet and gelato and got perfect results every time.
It is the priciest option on our list, retailing for about $500. Said our tester, "You’re paying quite a bit more for that extra convenience of not freezing the bowl, but if you’re someone who makes homemade ice cream regularly or impulsively, the price may be worth it."
Ultimately, we gave the Smart Scoop a 9 out of 10 for its convenience, customization options and creamy texture across different recipes.
KitchenAid Ice Cream Maker Attachment
Best Ice Cream Maker for Small Batches
Churning Time: 20 to 25 min | Maximum Yield: 2 qt | Dimensions: 9” L x 7” W x 11” H | Weight: 7 lb | Ease of Cleaning: The drive assembly and dasher are dishwasher-safe, but the freezer bowl requires hand-washing
If your KitchenAid stand mixer has a permanent place on your counter, the KitchenAid Ice Cream Maker Attachment may be the perfect ice cream maker for your kitchen. It consists of a freezer bowl, like most traditional ice cream makers, as well as a housing assembly and dasher that attach to the mixer. It took us less than a minute to attach the assembly to the mixer, but the freezer bowl required at least 16 hours in the freezer before we could make ice cream.
The benefit of the KitchenAid Ice Cream Maker Attachment’s design is that it doesn’t require as much storage space as other ice cream makers. We kept the bowl in the freezer when not in use and stored the housing assembly and dasher inside our stand mixer’s standard bowl with its whisk and other attachments. That meant we didn’t have to drag a standalone ice cream maker out of the cabinet whenever we wanted to make a batch.
Before starting each recipe with the KitchenAid Ice Cream Maker Attachment, we froze the bowl for 24 hours. That may have helped with the churning time and consistency of the finished product because we found it to be on par with ice cream makers with a freezer bowl that we tested, including the Cuisinart Pure Indulgence and the Cuisinart ICE-21 Automatic Ice Cream Maker. It took 21 to 24 minutes to churn our three ice cream recipes, and the results had a creamy texture and were slightly firmer than soft-serve. "It makes delicious ice cream," one of our testers said. "It was almost as firm as store-bought ice cream."
The KitchenAid Ice Cream Maker Attachment was also very easy to use. "As long as you know how to turn on a stand mixer, you can use the ice cream maker attachment," our tester said. After turning on our mixer, we only needed to pour the ice cream base into the bowl. Cleaning was quick, too, taking less than eight minutes to hand-wash all the components.
Overall, we scored it an 8 out of 10 because of its user-friendly design, convenient storage and excellent consistency and flavor across all the recipes we made.
How we tested
To find the best ice cream maker, we thoroughly tested our top models, scrutinizing everything from how easy they were to set up to the quality of the ice cream they produced. We also evaluated how easy each model was to use and clean.
Evaluating setup and assembly ease
We removed each ice cream maker from its box and set them up following the manufacturer's instructions. We timed how long the process took and noted any difficulties we encountered as we assembled each model.
Assessing design and usability
We evaluated each ice cream maker’s design by measuring its size and noting the space it took up on our testing area’s counter. We noted any potential issues given each model’s size, such as a taller model not fitting beneath low-hanging cabinets or a heavier model being difficult to take in and out of a cabinet.
We also tested how simple and intuitive each ice cream maker’s user interface was and assessed how much of a learning curve each had. Finally, we used a handheld decibel meter to note how loud each model was during operation to give us an idea of how disruptive it might be to use.
Evaluating performance, efficiency and versatility
We prepared at least three different recipes in each ice cream maker we tested, noting the consistency of the dessert right after churning, as well as after one to two hours in the freezer. In particular, we noted whether we could scoop the ice cream from each machine right after churning or if it needed additional time in the freezer to firm up. We also made at least one recipe in each machine with a mix-in ingredient like chocolate chips or crushed cookies to see how evenly they were distributed through the ice cream.
We assessed each model’s efficiency by noting both the prep time required and the time each machine needed to churn the recipes to reach at least a soft-serve consistency. For machines that made other desserts besides ice cream, such as Italian ice and milkshakes, we evaluated the texture and consistency of non-ice cream recipes to see how versatile the models really were.
Assessing ease of cleaning
To see how easy each ice cream maker was to clean, we hand-washed all the components and timed the cleaning process. For models with dishwasher-safe pieces, we cleaned them in the dishwasher according to instructions in the owner’s manual and noted any signs of wear and tear after washing.
Expert Tip
Washing out an ice-cold freezer bowl after use can be tricky. Soapy dishwater can freeze instantly on the inside or, worse, your wet fingers can freeze to the side of the cold bowl. For best results, use only room temperature or slightly warm water to continuously melt the freezing water and creamy mess. When done, quickly flip the bowl upside down on a dishtowel to thaw and dry.
BestReviews Cooking and Baking Expert
Key considerations for an ice cream maker
Types of ice cream makers
Ice cream makers for home use generally come in three main types.
Manual ice cream makers are the old-fashioned models you might remember from childhood. They have a container that holds a rock salt and ice mixture, acting as a refrigerant for your ingredients. These manual models usually make a gallon or more of ice cream at a time, but turning a crank to churn the ice cream can get tiring fast, so they’re best for occasional use.
There are, however, electric versions that give you that old-timey experience without the hand fatigue. If that appeals to you, we recommend the Elite Gourmet Old-Fashioned 6-Quart Wood Bucket Electric Ice Cream Maker as well as the Nostalgia Electric Ice Cream Maker.
Electric ice cream makers feature a freezer bowl that must be chilled for 16 to 24 hours before you make your ice cream. The machine takes care of churning on its own, making it a pretty hands-off process. You’ll love an electric ice cream maker if you make ice cream frequently. Electric ice cream makers we recommend include the Ninja CREAMi Deluxe, Cuisinart Pure Indulgence Automatic Ice Cream Maker, KitchenAid Ice Cream Maker Attachment and Cuisinart ICE-21 Ice Cream, Frozen Yogurt & Sorbet Maker.
Compressor ice cream makers are perfect for anyone who likes to make ice cream on the spur of the moment. The built-in compressor freezes the ice cream ingredients, while the machine churns the mixture, so you don’t have to remember to pre-freeze a bowl beforehand. We recommend the Breville Smart Scoop.
Capacity and batch size
Most home ice cream makers produce between 1 and 4 quarts of ice cream. If you’re making ice cream for just yourself, a model that makes between 1 and 1.5 quarts usually works well. If you’re making ice cream for two to four people, you’ll want a large model that can make at least 2 quarts at a time. But for parties and other special occasions — or if you just want to stock your freezer with plenty of your favorite dessert — large machines that can make 3 or 4 quarts are your best bet.
Our top picks: Capacity and batch size
- Ninja CREAMi Deluxe 11-in-1 Ice Cream Maker: It comes with two 24-ounce “pint” containers for freezing ingredients, which means you can make up to 48 ounces or 1.5 quarts at a time with the CREAMi Deluxe. To make larger batches, you’ll need additional pint containers you have to buy separately.
- Cuisinart Pure Indulgence Automatic Ice Cream Maker: Making up to 2 quarts of ice cream per batch, this ice cream maker is perfect for families. We didn’t experience any overflow when churning, either, so we got a full 2 quarts every time.
- Breville Smart Scoop Ice Cream Maker: The Smart Scoop has a 1.5-quart capacity, but because it doesn’t require pre-freezing a bowl, we could make additional batches without any waiting.
- KitchenAid Ice Cream Maker Attachment: Its freezer bowl makes 2 quarts of ice cream per batch, so it’s ideal for families or larger groups.
- Cuisinart ICE-21 Automatic Ice Cream, Frozen Yogurt & Sorbet Maker: It makes just 1.5 quarts per batch, but we worried it was occasionally about to overflow during testing, so we had to spoon some of the mixture out as it churned.
Preparation time and convenience
The prep work involved in making ice cream varies depending on the type of machine you choose. Most electric models have a freezer bowl that must be frozen for 16 to 24 hours before churning ice cream. However, if you have the space, you can just store the bowl in your freezer, so you’re always ready to make ice cream. On average, a freezer-bowl ice cream maker takes 20 to 30 minutes to churn a batch of ice cream.
With a compressor ice cream maker, you don’t have to worry about pre-freezing anything beforehand. However, the churning time for a compressor model is typically longer because the machine needs time to chill the ice cream mixture. A compressor model usually needs 45 to 60 minutes to produce ice cream.
While ice cream makers that require less prep time are often easier to use, you’ll want to consider other factors when deciding how convenient a model is. Many ice cream makers don’t have any controls beyond an on/off button, so you only have to press a button and pour in your ingredients to start making ice cream. Unfortunately, these simple models usually don’t have a timer that lets you know when the ice cream is finished churning, which means you must determine when it’s ready yourself.
Finally, don’t underestimate the importance of choosing an ice cream maker that’s easy to clean. Most models disassemble, ensuring you can clean each component and no sticky ice cream residue is left behind. You can even find models with dishwasher-safe components that make cleanup even faster. Keep in mind that the freezer bowls included with many electric models are never dishwasher-safe, so you’ll need to take a little extra time to hand-wash the bowl.
Our top picks: Preparation time and convenience
- Ninja CREAMi Deluxe 11-in-1 Ice Cream Maker: Unlike electric models with bowls you need to freeze before churning, the CREAMi Deluxe requires freezing your ice cream base for approximately 24 hours beforehand. Of the machines we tested, It’s one of the easiest to clean, because all its components are dishwasher-safe.
- Cuisinart Pure Indulgence Automatic Ice Cream Maker: As with other freezer bowl ice cream makers, we had to freeze the Pure Indulgence’s bowl for at least 16 hours before churning ice cream. However, we loved how easy it was to use because it featured a single on/off button.
- Breville Smart Scoop Ice Cream Maker: With its own built-in compressor, the Smart Scoop requires no prep work before you can start making ice cream. We also loved the “keep cool” feature, which kept our ice cream from melting for over an hour.
- KitchenAid Ice Cream Maker Attachment: We needed to put the KitchenAid Ice Cream Maker Attachment’s bowl in the freezer the day before we wanted to make ice cream, but it was one of the fastest to churn ice cream among freezer bowl models, taking 25 minutes or less.
- Cuisinart ICE-21 Automatic Ice Cream, Frozen Yogurt & Sorbet Maker: It was one of the easiest ice cream makers to operate because it only had an on/off switch. However, its bowl needed to be frozen for at least 16 hours and wasn’t dishwasher-safe.
Extra features
If you’re willing to pay a little extra, some ice cream makers provide additional features that increase their versatility or customization options. You can find some models that allow you to adjust the speed at which the ice cream churns, so you can enjoy your dessert more quickly. Other ice cream makers let you choose your desired hardness, making it easy to get a more creamy soft serve-like texture or a firmer, scoopable texture.
Nearly all ice cream makers can make other desserts, such as gelato, sorbet or frozen yogurt because you only need to switch up the ingredients you use. However, some models are versatile enough to prepare additional frozen treats like Italian ice or protein-rich light ice creams. You can even make drinkable desserts like milkshakes or slushies.
Our top picks: Extra features
- Ninja CREAMi Deluxe 11-in-1 Ice Cream Maker: The most versatile of all the ice cream makers we tested, we loved the ability to make more unique frozen treats like Italian ice and frozen drinks.
- Cuisinart Pure Indulgence Automatic Ice Cream Maker: In addition to ice cream, the Pure Indulgence was excellent at making vegan ice cream and sorbet during our testing.
- Breville Smart Scoop Ice Cream Maker: With 12 hardness settings, the Smart Scoop offers the most customization for the texture and consistency of your frozen treats. But it also has an Auto setting that took all the guesswork out of making perfect ice cream, gelato and sorbet during our testing.
- KitchenAid Ice Cream Maker Attachment: It can make ice cream, sorbet and gelato by changing up your ingredients, but it doesn’t offer specific hardness settings.
- Cuisinart ICE-21 Automatic Ice Cream, Frozen Yogurt & Sorbet: Like the Cuisinart Pure Indulgence, it can make ice cream, frozen yogurt and sorbet, but it doesn’t have specific speed or hardness settings.
Expert Tip
Do your research: Some freezer-bowl models offer a second freezer bowl in the package. A second bowl allows you to make a lot of one flavor or to make two different flavors without having to wash and re-freeze a bowl.
BestReviews Cooking and Baking Expert
FAQ
Q. Should I choose a freezer-bowl ice cream maker or a compressor-style model?
A. If you don't mind freezing a bowl or base ahead of time, freezer-bowl machines are simpler and usually cheaper. For example, the CUISINART ICE-21 Automatic Ice Cream, Frozen Yogurt & Sorbet Maker and the NINJA CREAMi Ice Cream Maker both need advance prep, but they’re straightforward to use. A compressor model such as the WHYNTER 2.1 Quart Upright Ice Cream Maker is better if you want to make ice cream on demand without planning a day ahead.
Q. What capacity should I look for if I want to make ice cream for a family or group?
A. For households that go through frozen desserts quickly, a larger batch size saves time and repeat cycles. The NINJA CREAMi Deluxe 11-in-1 Ice Cream Maker uses 24-ounce tubs and is designed for more variety and larger total output across multiple containers, while the WHYNTER 2.1 Quart Upright Ice Cream Maker can produce a bigger single batch than pint-based machines. If you usually make dessert for just one or two people, a smaller setup like the NINJA CREAMi Ice Cream Maker may be enough.
Q. How important are special settings like hardness control, mix-ins, or soft-serve modes?
A. Those features matter most if you want more control over texture or plan to customize recipes often. The NINJA Swirl by CREAMi adds soft-serve modes and a handle with three speeds, while the NINJA CREAMi includes Re-spin and Mix-in functions for smoother texture and better add-in distribution. If you mainly want simple ice cream or sorbet, a more basic machine like the CUISINART ICE-21 can still do the job well.
Q. How much cleanup should I expect after making homemade ice cream?
A. Cleanup is usually easiest when the main parts are dishwasher-safe, but freezer bowls often need hand-washing. The NINJA CREAMi Ice Cream Maker and NINJA Swirl by CREAMi both have dishwasher-safe components, which makes them especially convenient after a batch.
Q. What trade-offs come with richer ice cream versus lighter or lower-fat recipes?
A. Higher-fat mixtures usually give a creamier texture, while lower-fat recipes can freeze harder and taste less rich. That means a machine that handles texture well can help, but the ingredients still matter more than the appliance. Models like the NINJA CREAMi and the WHYNTER 2.1 Quart Upright Ice Cream Maker can both produce smooth results, but the base recipe will still determine how scoopable the final dessert is.
Our expertise
Jennifer Blair has written about kitchen and home products for BestReviews since 2017, penning over 100 articles. She enjoys making homemade ice cream and gelato, having previously used a Cuisinart ice cream maker and currently relying on a KitchenAid ice cream maker attachment. Additionally, she’s personally tested ice cream makers for BestReviews, including models from Ninja and Breville.
Jordan Hutchinson has been at BestReviews since 2021, and he now manages people and products for the testing lab. While he specializes in testing, Jordan also writes about trending tech topics. He has extensive knowledge of computers, TVs, speakers and other handheld electronics as well as products for the home and kitchen that make life better.
Andrea Boudewijn is a Cordon Bleu-trained pastry chef operating Superfine Bakery out of Los Angeles, California. Her work has won several awards as well as appeared in magazines such as Martha Stewart Weddings, The Knot, Brides, and more.