There are a lot of ways to cook, including grilling, baking, boiling, steaming and more. Sous vide cooking was uncommon for a long time, but has gained a ton of popularity in recent years. It can be a little intimidating to get into if you’ve never heard of it, but it’s actually quite simple. Plus, it can produce juicy, flavorful results that you can’t quite get from any other method.
Shop this article: Lodge Cast Iron Skillet, Booker and Dax Searzall Torch Tip and Anova Nano
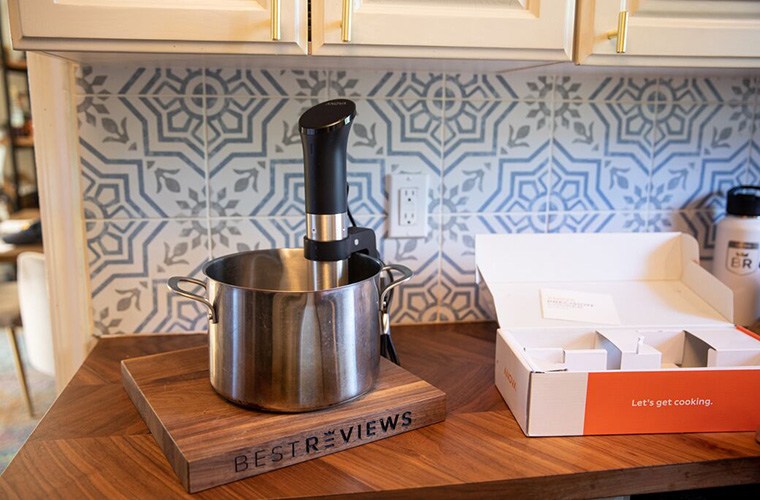
Sous vide cooking starts with a reservoir of water (for example, a stockpot) heated to a consistent temperature that varies depending on the type of food and, if you’re cooking meat, the specific cut.
Wrapped in a sealed, water-tight bag with no air inside, the food goes into the water and stays there for a certain amount of time. Like the temperature, sous vide time differs between types of food and cuts of meat.
Once the food’s been at the right temperature for the right amount of time, it’s removed from the water and the bag. At that point, some foods require a little more preparation to be ready for the plate. This is especially true with meat.
You almost always heat the water with what’s called an immersion circulator, which is basically just a heating element and small water pump. You can preheat the water a little to cut down on waiting time, because the heating element in a home immersion circulator isn’t very strong. Once the water reaches the desired temperature, the circulator keeps it there consistently.
While you’re waiting on the water to reach the right temperature, it’s time to bag your food. Make sure it’s fully seasoned (salt included) and place it in the bag. Here’s where you’d use your vacuum sealer if you decided to invest in one.
If you don’t have a vacuum sealer, a simple zip-close bag works fine. You’ll use what’s called the water immersion technique to remove the last bits of air. Put the meat in the bag, squeeze out as much air as you can, then seal most of the bag’s closure, leaving a half-inch or so for air to escape.
Slowly submerge the bag in a pot of water (not the hot water you’re preparing) while massaging the food to help any remaining air bubbles escape. Once the water pressure has forced the air out, finish sealing the bag.
After that, carefully place the sealed bag into the water. Next, set a timer for the exact level of doneness you’re looking for. Now it’s time to play the waiting game.
If you have a little cooking (or eating) experience, you probably know what grilled chicken breast looks like. A chicken breast fresh out of the sous vide machine will look nothing like that. In fact, it might not look remarkably appetizing at all. That’s because of the difference between wet and dry heat.
The concept is about as simple as it sounds. Dry heat comes from methods such as frying, grilling and baking, which dry out food as it cooks. Wet heat is the hallmark of boiling and steaming, where food doesn’t dry out.
Aside from the removal or introduction of moisture, the other fundamental difference is temperature. Wet heat will rarely get higher than roughly 210 degrees because of the boiling point of water. Dry heat, on the other hand, can reach 1,000 degrees or more.
While sous vide cooking doesn’t add moisture, it doesn’t take any away and is considered wet heat because it can’t get above the boiling point of water. Wet vs. dry heat matters because once you take the meat out of a sous vide bath, it’s probably not quite ready to eat. It will likely need to be seared.
To get the highly sought-after browning on the outside of a chicken breast, steak or other cut of meat, you’ll need a little dry heat. Most commonly, this comes from a skillet that’s preheated to nearly the oil’s smoke point.
After removing the bagged food from the water, let it sit on the counter for about 10 minutes. The point here is to stop the actual cooking process by lowering the temperature slightly. Once it’s cooled off a little, place it in the skillet with a small amount of oil. Make sure the skillet is as hot as it can be — in the industry, we call it “ripping hot” — and cook each side of the meat for only as long as it takes to brown each side of the meat. Any longer, and the residual heat will overcook the inside.
Once each side is browned, it’s time to eat.

This rugged cast iron skillet should last for years with proper care. It’s about as heavy and well-seasoned as they get.
Sold by Amazon
To get the best possible sear while greatly minimizing the risk of overcooking, you need a blowtorch. Not one of those tiny kitchen torches, either, but an actual blowtorch. You can get by with the widest standard nozzle possible, as you want to avoid the focused flames that slim nozzles produce. Your best bet, though, is to get a searing attachment, which will practically turn your blowtorch into a handheld infrared burner.

Booker and Dax Searzall Torch Tip
This novel torch tip will deliver the most perfectly seared steak you’ve ever eaten. Interestingly, it’s designed and sold by the same Dave Arnold responsible for the bestselling cocktail book “Liquid Intelligence.”
Sold by Amazon

For the Searzall, you need either this torch head or its less expensive relative, the TS4000. This one’s far better because it gets a lot hotter.
Sold by Amazon

Bernzomatic All Purpose Propane 4 Pack with Utility Torch
This pack of four 16-ounce cylinders fits most portable propane appliances and comes with a utility torch to make on-the-go cooking easy and hassle-free.
Sold by Amazon

It’s compact, heats quickly, has a convenient Bluetooth app and is widely considered the best sous vide immersion circulator.
Sold by Amazon

It heats faster than most of the competition despite also being smaller, but it does cost a lot.
Sold by Amazon and Sur La Table

This compact and reasonably priced vacuum sealer is a versatile tool that makes sous vide cooking and general food storage easier.
Sold by Amazon
A. You don’t absolutely need a vacuum sealer, especially if you’re just getting started. It’s a bit ironic because the literal English translation of the term is “under vacuum,” but a simple resealable plastic bag will do the trick.
Nonetheless, a vacuum sealer might be worth investing in. If you decide you love sous vide cooking, having a roll of low-cost and high-strength vacuum bags can make the process easier. It’s also a little less stressful working with heat-sealed bags than zip-close bags, which aren’t the most secure. Plus, vacuum sealing is a great way to store leftover meals and ingredients, especially in the freezer.
A. Just like most other forms of cooking, you should salt most foods before you sous vide them.
A large number of trendy sous vide enthusiasts will tell you that you should only salt meat (steak, for instance) after the sous vide process is finished. Don’t listen to them. Their claim will often be backed up by some bit of nebulous pseudoscientific wisdom such as, “It imparts a cured texture.” That, in particular, is patently false, because there’s no single, monolithic texture of all cured foods. For that matter, wet cures and dry cures require different chemicals and much longer times, as opposed to the simple table salt that goes on a steak right before cooking.
Instead, always add the salt and other seasonings to meat before it even goes in the sous vide bag. In reality, the added 40 or so minutes in contact with salt will help the seasoning flavors seep into the meat a valuable millimeter or two. In fact, just 40-60 minutes of salt exposure can break down muscle and connective tissue enough to help slightly with the browning Maillard reaction.
A. As long as you stick to the formulas and timetables and cook everything thoroughly, sous vide cooking is as safe as any other method. It’s also as healthy as any other since it doesn’t introduce fat like frying does. Since it’s safe and healthy, and doesn’t harm flavors the way frying, boiling, baking and steaming can, it’s no surprise sous vide cooking is one of the hottest culinary trends.
A. Think back to the last time you had a steak, or, for that matter, a piece of toast. The soft, slightly chewy inside was pleasant, but the real flavor is in the crusty brown layer on the outside. That brown coloration and complex flavor comes from what’s called the Maillard reaction.
The Maillard reaction is similar in effect to caramelization, in which heat transforms sugars into a complex collection of flavorful chemicals. There aren’t many sugars in meat or bread, though. Instead, the Maillard is a different reaction from caramelization, and it transforms amino acids (tiny building blocks of proteins) into similarly complex groups of chemicals. In other words, the Maillard reaction is responsible for a great deal of the most prized flavors in cooking.
Sign up here to receive the BestReviews weekly newsletter for useful advice on new products and noteworthy deals.
Chris Thomas writes for BestReviews. BestReviews has helped millions of consumers simplify their purchasing decisions, saving them time and money.
BestReviews spends thousands of hours researching, analyzing, and testing products to recommend the best picks for most consumers.