Buying guide for best sewing machines
Ready to buy now? Shop the best: I have the worst luck with my clothes. Whenever I find an item I love, it inevitably suffers some kind of damage — a rip in a seam, a fallen hem, a hole in the sleeve. My first instinct was to just go and buy a replacement, but my bank account didn't like that much. Instead, I invested in a sewing machine and started mending my clothes like my grandmother always used to.
But here's the thing: I nearly flunked the sewing unit in my home ec class in middle school for the wonky seams on my throw pillow, so I need a machine that's essentially foolproof. My sister, on the other hand, is a master quilter and embroidery artist, so she wants a machine that can do everything from the simplest mending to the most complicated designs. The good news is that regardless of what you want to sew or your skill level, there’s a sewing machine to match your needs.
Many novice and occasional sewists like me prefer a simpler mechanical model. These machines are easy to use, and today’s versions offer useful features like adjustable stitches and straightforward controls.
Computerized sewing machines with advanced features like dozens of stitch options and vivid touch screens meet the needs of skilled sewists like my sister, who are usually working on more complex projects. Some machines can do quilting and embroidery, with built-in Wi-Fi connectivity that pairs with a computer for quick access to patterns. Other models to consider include sergers for overlock stitching and inexpensive compact machines that can quickly mend holes or sew on buttons.
At BestReviews, we've researched and evaluated numerous sewing machines to find the best models. Our top pick, the Singer Heavy-Duty 4423 High-Speed Sewing Machine, stood out for its impressive selection of features that work for all skill levels. It also has a durable metal frame, which allows it to hold up to heavy sewing.
Editors' picks
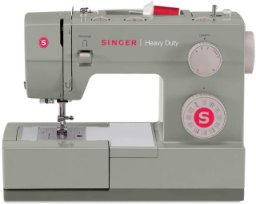
Singer Heavy-Duty 4423 High-Speed Sewing Machine
Editors' Favorite
Product Dimensions: 15" W x 6.25" D x 12" H | Weight: 17.1 lb | Built-In Stitches: 97 stitch applications | Buttonholes: 1 one-step style
The Singer Heavy-Duty 4423 High-Speed Sewing Machine doesn’t tiptoe around tough fabrics; it charges right through them. With 97 stitch applications and a motor that boasts 50% more power than standard machines, this workhorse is built to handle everything from denim to canvas without breaking a sweat.
It’s the kind of machine you keep on hand for mending, hemming or tackling that “someday” upholstery project you’ve been putting off. The one-step buttonhole feature and automatic needle threader shave time off your prep work, though you may need a little patience with the threader.
What really makes this machine stand out is its no-nonsense build and raw stitching muscle. It's not the fanciest machine in the room, but it’s the one that’ll roll up its sleeves and get the job done. Some users might find the speed a bit much, but once you find your rhythm, it’s smooth sailing.
Janome Couture Sewing Machine
Great Value
Dimensions: 16" W x 7" D X 12" H | Weight: 12 lb | Built-In Stitches: 15 | Buttonholes: Four-step buttonhole
The Janome Couture is an easy-to-learn mechanical sewing machine, making it an excellent first machine. It comes with a straightforward manual, online tutorial videos that make the fundamentals approachable, and the built-in bobbin loading guide at the front of the bobbin area helps remove one of the most common beginner pain points.
On top of that, the solid metal interior frame and extra-high presser foot lift give this 12-pound machine impressive stability and the clearance needed for thicker seams.
There are a few trade-offs to keep in mind. The stitch selection is small, so if you want lots of decorative or programmable options, you may find it limiting. Buttonholes are also done with a four-step sequence rather than the one-step automatic buttonhole you’ll see on some computerized machines.
Overall, if your priority is a robust, affordable, full-size machine that’s simple to pick up and capable across a variety of projects, the Janome Couture is a solid choice.
Singer Heavy Duty 4411
Best No-Frills Machine
Dimensions: 15" W x 6.25" D x 12" H | Weight: 14.6 lbs | Built-In Stitches: 69 stitch applications
The Singer Heavy Duty 4411 offers boosted motor power and a metal interior that make it easier to sew through thick stacks, like denim, canvas or multiple-seam layers.
Its speed is solid too, with a top rate of up to 1,100 stitches per minute. Boasting 69 stitch applications, it gives you a wide range of practical choices, and day-to-day setup is straightforward thanks to the top drop-in bobbin with a clear cover. If you ever need a quick refresher, you can also rely on the Creativate app for manuals and tutorials.
Some users report occasional threading and bobbin quirks. But past that, if you want a rugged machine that's great for denim, home decor and most garment projects, the 4411 is a great pick.
Brother XR3774 Sewing & Quilting Machine
Best for Quilting
Product Dimensions: 15.3" W x 5.8" D x 12" H | Weight: 15 lb | Built-In Stitches: 37 | Buttonholes: 1 one-step style
The Brother XR3774 Sewing & Quilting Machine is a real crowd-pleaser for beginners and hobbyists alike; it’s like the Swiss Army knife of sewing machines without the sticker shock. With 37 built-in stitches, including decorative and quilting options, plus a one-step buttonhole, it gives you just enough variety to let your creativity stretch its legs without feeling overwhelmed.
The wide table is a game-changer for bulkier projects, and the free arm makes quick work of sleeves and pant legs. Whether you're hemming curtains or piecing a baby quilt, this machine is ready to roll up its sleeves and get to work.
What really wins folks over is its no-fuss setup and user-friendly design. The automatic needle threader is a godsend (when it works) and the drop-in bobbin system helps you avoid those “how did I jam it again?” moments.
The included instructional DVD is old-school, sure, but surprisingly helpful if you're just getting your bearings. Some users have had quality-control hiccups, but for the price point, the XR3774 still gives the fancier machines a run for their money. It’s not a top-tier powerhouse, but it’s a steady, affordable partner for everyday sewing tasks that won’t leave you disappointed.
Singer Prisma Heavy-Duty Sewing Machine
Best High-Speed Sewing Machine
Dimensions: 12" W x 15.5" D x 6.25" H | Weight: 14 pounds | Built-In Stitches: 11 | Buttonholes: 1 (4-step)
The Singer Prisma Heavy-Duty Sewing Machine's bold rainbow-checkered design brightens up a craft room and looks like a machine that’s meant to be displayed as much as used. The sturdy metal frame feels solid, and the higher piercing power shows up right away when you’re sewing dense materials.
With speeds up to 1,100 stitches per minute, plus adjustable stitch length and width, you can move through projects efficiently. On top of that, the free arm simplifies sleeves and hems, making them far less tedious.
There are intermittent threading and bobbin issues that are worth mentioning, and the thread can snag, and the bobbin thread may occasionally come loose. But, if you want an affordable, heavy-duty machine that handles tough materials, this is a great option.
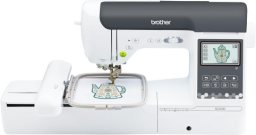
Brother SE2000 Computerized Sewing & Embroidery Machine
Best Sewing & Embroidery Machine
Product Dimensions: 17.56" W x 9.49" D x 11.81" H | Weight: 38 lb | Built-In Stitches: 241 | Buttonholes: 10 one-step auto-size styles
The Brother SE2000 Computerized Sewing & Embroidery Machine is the kind of machine that earns its keep and then some. It’s a powerhouse wrapped in sleek plastic, offering an impressive combo of 241 built-in stitches, 193 embroidery designs and wireless file transfer, which is a breath of fresh air in a world still tangled up in USB cords.
But what really makes the SE2000 stand out is how smoothly it jumps between tasks. It handles thick layers without grumbling, and the large embroidery field gives you space to stretch your imagination.
Setup’s a breeze once you get the hang of it, and the Artspira app brings fresh designs to your fingertips like a digital sketchbook on demand. It’s not whisper-quiet, and the threader might test your patience on occasion, but for a machine that balances embroidery, sewing and tech-forward features this well, it’s hard to beat.
Singer M3500 Lightweight & Portable Sewing Machine
Best Lightweight & Portable Machine
Product Dimensions: 15.16" W x 7.35" D x 10.9" H | Weight: 11.79 lb | Built-In Stitches: 110 stitch applications | Buttonholes: 1 one-step style
The Singer M3500 Lightweight & Portable Sewing Machine is a straight-shooting sewing machine that keeps things simple without skimping on versatility. With 110 stitch applications, including stretch, decorative and basic options, it’s more than capable of handling your everyday mends, weekend crafts and even that denim patch job you've been avoiding.
The one-step buttonhole feature is a lifesaver for anyone who’s ever fumbled through manual buttonholes, and the built-in needle threader is a welcome touch that makes setup feel less like a chore and more like a warm-up.
That said, it’s not without its quirks — some users mention needle breakage and inconsistent tension. Still, if you’re looking for a solid starter or an everyday companion that won’t break the bank, the M3500 makes a reliable sewing sidekick.
Brother SE700 Sewing Machine
Best for Creating Designs
Dimensions: 7.76" W x 16.5" D x 12.09" H | Weight: 15.6 lb | Built-In Stitches: 103 | Buttonholes: 10 one-step auto-size buttonholes
The Brother SE700 is a good middle-ground for those who want to try out sewing and embroidery without juggling two separate machines. Moving between the 103 built-in sewing stitches and the 135 embroidery designs doesn’t feel clunky, and the automatic needle threader paired with a jam-resistant drop-in bobbin helps keep stops and restarts to a minimum.
A lot of the value here comes from the convenience features. The color touch screen makes it easy to do basic on-machine edits, and wireless LAN support with Design Database Transfer gives you a straightforward way to move designs over without extra steps.
The embroidery field is fixed at 4 by 4 inches, so larger projects like full-jacket backs, big monograms or anything that needs a larger hoop, might make you feel a bit cramped. Aside from that, the SE700 is an awesome pick if you want an easy way to swap between sewing and embroidery.
Singer Quantum Stylist 9960 Computerized Sewing & Quilting Machine
Best for Advanced Garment Sewing
Product Dimensions: 17.25" W x 8.25" D x 12" H | Weight: 14.6 lb | Built-In Stitches: 600 | Buttonholes: 13 one-step styles
The Singer Quantum Stylist 9960 Computerized Sewing & Quilting Machine is the kind of sewing machine that doesn’t just show up — it shows off. With a jaw-dropping 600 built-in stitches and more than a thousand stitch applications, this model isn’t here to dabble. It’s a dream for quilters, crafters and fashion-forward DIYers who want more than just the basics.
From monogramming to mirror imaging, it offers features that let your creativity run wild without the usual tech headaches. Add in the automatic needle threader, top drop-in bobbin and one-touch thread cutter, and you're saving time before you even start stitching.
What sets the 9960 apart is its attention to detail without turning the learning curve into a cliff. It’s user-friendly enough for ambitious beginners, but seasoned sewists will find plenty to love under the hood. The speed control is a lifesaver for delicate work, and the large extension table is perfect when you need room to roam. It’s not without quirks; the thread cutter can be finicky, and a few users report hiccups with the feed dogs. But when this machine hits its stride, it hums along like a pro.
What to know before you buy a sewing machine
Type
Mechanical: Mechanical sewing machines have manual controls for functions like setting the thread tension and adjusting the length of stitches. These machines have push buttons and/or rotary dials, and for some traditionalists, there’s no substitute for the feel of these controls. Note that mechanical machines are bulkier than the other types.
Electronic: Electronic sewing machines have the ability to execute a number of stitches, usually many more than a mechanical machine. If you’re looking for more options in stitch width and style, these are the machines to consider. The interface is more sophisticated, activating features with the help of electronic switches or LCD display. Electronic machines tend to cost more than mechanical ones.
Computerized: These are also electronic machines, with some key differences. One is that these can be connected to a computer via USB. With an internet connection, sewists can download stitch patterns and transfer them to the sewing machine. For tech-savvy crafters, this type of machine opens a world of convenience and possibility, including the ability to embroider. However, for someone who isn’t familiar with newer technology, this could seem overwhelming. Further, if a computerized sewing machine needs repairs, it can cost more than fixing a mechanical or even an electronic machine.
Serger vs. sewing machine
A serger is more sophisticated than a sewing machine in some ways. For example, it can manipulate two to four threads at once, creating heavy-duty overlock stitches that don’t tug at the material. In fact, a serger is sometimes called an overlock machine. It’s also designed to place stitching over the edges of material for a finished look. However, a serger is not a good substitute for a sewing machine because there are some tasks you simply cannot do with a serger, like topstitching.
Ease of use
Sewing requires meticulous attention to detail. Machines that are easy to use can cut down on sewing time and eliminate errors. Sewing machine elements that can make your tasks easier include the following:
- Drop-in bobbin
- Automatic bobbin threading
- Clear cover plate
- Automatic needle threader
- Simple needle replacement
- Speed controls independent of foot pedal
Skill level
When deciding what features you want in a sewing machine, keep in mind your skill level, what you plan to sew and how often you’ll use your machine.
Beginner: A sewing machine for beginners has the most basic features and usually nothing more. Portable sewing machines designed for use on the go might also offer just the basics. Common basic features include straight and zigzag stitches, reverse button (for lock stitching), adjustable tension and stitch length and width adjustment. These features allow you to handle basic sewing projects.
Intermediate: If you’re looking to expand your abilities, there are more advanced features that aren’t necessary for most projects but are nice to have when you need them. These include one-step buttonhole (there are four-step buttonholes, but they can be tricky); a choice of presser feet, such as buttonhole, zipper and blind hem; automatic speed setting that sets speed either in conjunction with or instead of using a foot pedal; and needle threader.
Advanced: For advanced sewists, the features list continues to grow. Some you might want to consider include free motion ability, layered fabric feeding system, touchscreen control panel and large hoops for embroidery.
Types of stitches
Every sewing machine offers its own variety of standard, decorative and advanced stitches, from a few to over 100, but there are some basic stitches most machines offer. You should be able to adjust the width, length and tension of the stitches for the best results. Look for these essential stitches when shopping for an entry-level or mid-range sewing machine.
Straight: The straight stitch is the workhorse of the sewing world. The needle and thread move forward in a straight line while the machine feeds the material toward the sewist. The result is two pieces of fabric joined by a seam. You must be able to adjust the tension on this stitch for light or heavy fabrics and fabrics of different thicknesses. Most machines allow you to adjust the length of the stitch too.
Zigzag: This is the other foundational stitch you must have if you’re working with fabrics that have any stretch. The zigzag allows the fabric to stretch without popping the stitches. You can adjust the height and length of the stitch according to the amount of stretch in the fabric.
Lock: Sewing machines handle the lock stitch in one of two ways. The first is to sew backward over an existing line of stitches, creating a backstitch at the beginning and end of a seam. If this isn’t automatically done by the machine, there is a button or lever to hold down when you want to sew backward. When the button or lever is released, the machine sews forward again. The other type of lock stitch creates a nearly invisible knot at the beginning and end of the seam.
Buttonhole: Sewing buttonholes is considered one of the most difficult tasks for traditional hand-sewists. The top, bottom and sides must be reinforced to prevent rips. Accurate placement is also important. A machine with an automatic buttonhole option removes much of the guesswork by performing a preprogrammed series of reinforced stitches.
Overlock: An overlock stitch might be a little advanced for beginners, but it doesn’t take much time to master and use. The exposed edge of the fabric on the inside of a seam can fray if it isn’t finished properly. You can use a zigzag stitch or pinking shears, but if you want a more finished look, the overlock stitch secures loose seams and creates a professional finish.
Decorative and embroidery: One of the joys of a sewing machine is the ability to create decorative stitches. Many sewing machines, even those in the entry-level price range, offer a selection of freehand and embroidery stitches for creative projects. Adding a personalized initial or floral pattern to a pillow case is easy to do with the right machine and some practice. A few decorative stitches to look for include the crescent stitch (for borders on tablecloths, pillowcases, collars or skirt hems); a darning stitch (for darning socks); a tacking or utility stitch (for quickly holding fabric pieces together before sewing the seam); a rickrack stitch (for attaching decorative rickrack).
Common sewing machine mistakes
Most sewing machines require careful attention to detail and mastery of complex gears and controls. It isn’t an easy process to learn, and mistakes are part of the journey toward becoming a skilled sewist. Here are some common mistakes made by both beginners and experts.
Assuming basic measurement techniques are simple: Measuring 18 inches of fabric with a tape measure or estimating the location of buttonholes with a ruler might seem easy, but when it comes to sewing, very few tasks are as simple as they appear. The final piece might be 18 inches long, but the actual size to measure is often different. There are seam allowances to consider, as well as the nature of the fabric itself. Beginners shouldn’t rely strictly on linear measurements when cutting material.
Taking on large projects too soon: Creating one costume for a school dance recital is different from agreeing to finish two dozen identical costumes in a week. Take the time to learn and master the capabilities of your new machine before you tackle a big project.
Disregarding sewing pattern instructions: Some beginners decide to improvise or rework existing instructions, but more often than not this ends in disappointment. Try not to make the mistake of second-guessing the pattern creators or looking for shortcuts.
Pulling the material too hard: Some beginners pull firmly on the material in order to ensure a straight seam, but this tension creates more problems: the metal teeth that pull the material through the machine can’t grip it properly. It’s better to let the machine do most of the work with minimal interference.
Safety
Getting a sewing needle through your finger is an unpleasant experience that can require a trip to the doctor. As with other kinds of machinery, it’s best to take a few extra precautions to prevent injury.
Turn off the machine if you’ll be away for more than a few moments. Foot pedals, needles and the buttons on a sewing machine are tempting for children and pets alike. Turning the machine off prevents them from potential harm or ruining your fabric or project.
Remove any pins from fabric before sewing. Sewing over a pin can bend the needle and throw off the timing of the sewing machine. In the worst-case scenario, the needle can break and the shards could potentially injure you.
Have the machine serviced regularly. Do this at least once every two years or more often if you sew frequently. This keeps the machine running smoothly and removes any potential danger from wiring or electrical damage.
Tips for using a sewing machine
- Don’t use the needle itself as a guide for straight stitching. It will confuse you and cause unnecessary adjustments. Use another point of reference, such as a pattern in the material or a chalk line.
- Try going barefoot (or at least shoeless) when using the pedal. Hard-soled shoes can decrease sensitivity and cause you to go too quickly. In sewing, there is rarely a need to put the pedal to the metal.
- Use the same type of thread in the needle and bobbin. The thread in the bobbin and the thread in the spool don’t have to be the same color, but they should be the same material. For example, pair cotton thread with cotton thread, but avoid combining polyester and cotton.
- Use small paper binder clips to hold materials together. This is a particularly useful hack for those who hate the idea of tacking with sharp needles.
- Spray the end of the thread with hairspray. This can make it easier to thread it through the needle.
- Keep a lint roller and large magnet in your sewing kit. The lint roller can easily pick up any tiny threads created by the sewing process, and the magnet can pick up any stray needles before your bare foot does.
- Skip the pins. Many professionals don’t use pins when cutting patterns because pins can cause the fabric to pucker. Try using pattern weights instead.
- Check out online tutorials. You can find many comprehensive tutorials on the websites of big-name sewing machine companies.
FAQ
Q. How much do sewing machines cost?
A. Sewing machines come in a wide range of prices, from less than $100 to more than $2,000. Portable or basic mechanical models are the most affordable, costing around $150 or less. They typically don’t offer a lot of fancy features, but they’re suitable for occasional use and beginners. The sweet spot for most sewists is between $150 and $600. These models offer many useful features like adjustable decorative stitches, automatic needle threading and quilting capabilities. Most sergers also fall in this price range. Avid hobbyists and experts can pay $600 and more for a computerized sewing machine that can be used for embroidering and quilting. These durable models have spacious tables for big projects, powerful motors, numerous stitch options, large touch screens and other high-end features.
Q. I love my new sewing machine, but I don’t love buying replacement needles. Why do needles break so often?
A. There are a number of reasons why needles fail. An inexpensive needle might not last as long as a high-grade one. Buy needles from a reputable company. Make sure the needle you’re using is the right one for the task. Size matters, as does the nature of the fabric. A heavier material could cause a weaker needle to snap. Replace your needle after 16 hours of use. Worn needles can fatigue and break.
Q. My child likes to watch me sew. Would it be safe for me to let them use a real sewing machine if I supervise?
A. The answer depends on the child’s level of respect for the machine. Some parents allow older children to use a mechanical sewing machine or an electric one with the power cord unplugged and stitches made by turning the wheel by hand. Supervision and training are always advised. Other children might respond well to a toy sewing machine with safety features. Hand-sewing small craft projects might also be a safer alternative to using a sewing machine.
Q. What features matter most for sewing thick fabrics like denim or canvas?
A. Look for a strong motor, a metal frame, and enough speed to push through multiple layers without stalling. For example, the SINGER 4423 Heavy Duty Model and SINGER 4411 Heavy-Duty Sewing Machine are built for heavy fabrics and faster stitching, so they handle tougher seams more confidently than lighter beginner models. If you sew dense materials often, also watch for a presser foot lift and a good selection of utility stitches.
Q. How do I choose between a mechanical sewing machine and a computerized one?
A. Mechanical machines are usually simpler, with manual dials and fewer features, which can make them easier to learn and maintain. Models like the JANOME Easy-to-Use Mechanical Sewing Machine and BROTHER XM2701 Sewing Machine are good examples of straightforward machines for basic projects, while the SINGER Quantum Stylist 9960 adds many more stitch options and digital convenience. If you want fewer decisions, mechanical is easier; if you want more stitch variety, computerized is more flexible.
Q. What should I look for if I want to sew and embroider on the same machine?
A. A combo machine should have both built-in sewing stitches and embroidery designs, plus features that make design transfer easy. For example, the BROTHER SE2000 offers wireless file transfer, 241 built-in stitches, and 193 embroidery designs, while the BROTHER SE700 includes wireless LAN support and a color touch screen for editing designs. Also check the embroidery field size, since a fixed 4 x 4-inch area can limit larger projects.
Q. How important is portability if I need to move my machine around often?
A. Portability matters if you plan to sew at classes, craft nights, or in a small space, but lighter machines may give up some power on thicker fabrics. The SINGER M3500 is a good example at just under 12 pounds with a built-in handle, while the BROTHER XM2701 Sewing Machine is also compact and easy to carry. If you move your machine often, look for a low weight, a handle, and simple setup features like a drop-in bobbin.
Our expertise
Jennifer Blair has covered kitchen, home and lifestyle products for BestReviews since 2017. She has written over 100 articles on household appliances, such as sewing machines, vacuum sealers, air fryers, vacuum cleaners and more.
Amy Evans joined the BestReviews team to combine her love of writing with a passion for shopping and finding deals in the home space. With a background in e-commerce, Amy has 4+ years of experience in product reviews and roundups. She specializes in home decor and furnishings, having written over 30+ articles in these categories out of 60+ articles on home and yard products. Amy has extensive knowledge of design styles and interior decorating, as well as the features and materials of quality home products.