Buying guide for Best window films
Do you have a window that you aren't quite happy with? Maybe it lets in too much sunlight or is positioned so that it presents privacy concerns. Perhaps it just looks drab, and window treatments do little to improve it. Regardless of your concern, there is an affordable way to alter the functionality and look of almost any window in your home without breaking your budget: window film.
While installing new windows can be costly, covering existing windows with window film can make changes from room-darkening effects to refreshed aesthetic appeal. You might want to reduce the visibility into your home or turn a window into a focal point with an eye-catching look.
What is window film?
Window film is a thin material that adheres to the smooth surface of a window to alter the appearance of the glass. Although some companies make window film from ceramic, laminate, or carbon materials, most film is made of polyester using a polyethylene terephthalate, or PET polymer. The flexible nature of the film produces a seamless fit when applied correctly, making it nearly impossible to tell that the window wasn’t custom-made to be darker or fancier than it actually is.
Applying window film has different benefits, and the film that’s best for you depends on what you want to accomplish.
Benefits of window film
-
Privacy: Some types of window film can make it harder for people outside to see inside.
-
Décor: Updating the look of a window with specialized film can take it from boring to stylish.
-
Darken: Some window film reduces the amount of light that enters a room.
-
UV protection: Some films prevent UV light from entering, which can help protect furniture, carpet, fabrics, and occupants from the damaging rays of the sun.
- Safety: Broken windows happen, whether from a ball or an act of nature. A window covered with film is less likely to send broken pieces flying in all directions.
Types of window film
Depending on what you want to change about your windows, there is a type of window film available that will accomplish the look or function you desire.
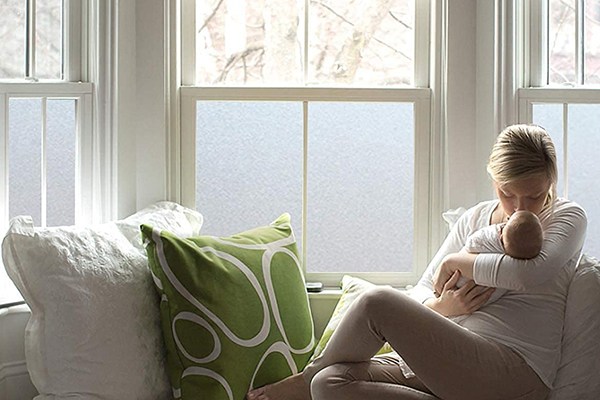
Light blocking: Do you have a room that lets in too much sunlight? Window film that falls into this category is ideal for making rooms dimmer during the daytime hours. This feature is especially useful for sleeping babies and individuals who work at night and need to sleep during the day. This film is also available in different levels of darkness, with some that are opaque enough to almost completely darken a room.
Privacy: If you live on a busy street, close to other buildings, or your yard is the one where all the neighborhood kids like to gather, privacy can be a concern. Window film with a frosted, textured, or patterned finish can help correct this issue by blurring or completely obscuring the people and objects on the other side of the window. It’s perfect for ground-level rooms where privacy is especially important, such as bedrooms or bathrooms.
Decorative: This type of window film typically serves two purposes. Not only does it add an attractive design for an updated look but it also offers some degree of privacy. It’s available in a variety of styles, from artsy to floral and numerous options in between. Some decorative window film even creates the appearance of stained glass.
"Do an inventory of all your supplies and make sure they’re within reach before you begin to apply your window film. That way you won’t have to search for a vital tool when you need it most."
STAFF
BestReviews
Applying window film
Window film sticks to windows either with a pre-applied adhesive or by static cling. Although the application process for both types of film is similar, there are some pros and cons to each.
Adhesive
Pros:
-
Long lasting
-
Durable
-
Tends to stay put
Cons:
Static cling
Pros:
Cons:
Expert tip
Prior to peeling off the backing for adhesive films, be sure to wash your hands to minimize fingerprints on the backside.
BestReviews Home Improvement and DIY Expert
Tools and supplies for applying window film
Window cleaner
It’s necessary to remove any dirt or residue from your windows before you apply the film. This initial step helps the film adhere to the glass.
Towels or paper towels
These are for cleaning the windows. You’ll also use towels or paper towels to gently dry the windows after applying the film.
Spray bottle filled with water
Use this to wet the windows before applying the film. This is what enables the film to stick to the glass, whether you choose film that adheres with adhesive or static cling.
Ruler
You’ll need this to trim your film to the perfect size. The more accurately you cut the film, the less trimming you’ll need to do once the film is in place.
Pencil
You might need a pencil to mark the film or a small section of the window frame to guide you in trimming and placing your film accurately.
Cutting tools
You’ll need scissors to cut the film and most likely a utility knife to trim excess film after you apply it to the glass.
Squeegee
You’ll use a squeegee to squeeze out bubbles, lines, creases, and excess water as you put your window film in place.
Expert tip
The trick to getting very clean cuts is to have a sharp blade in your utility knife. You may need to change the blade midway through the project if it dulls.
BestReviews Home Improvement and DIY Expert
There are three main types of window films: light-blocking, privacy, and decorative. We consider all types, thinking carefully about the benefits each product offers.
Window film sticks to windows with a pre-applied adhesive or by static cling. We research products of both types, weighing the pros and cons of each.
We research how easy it is to apply various window films and find out what supplies are required to apply each product.
When assessing privacy window films, we look at all styles, including frosted, textured, and patterned films. We also discern between those that blur and those that completely block the view.
We research the different “levels” of darkness various light-blocking window films provide.
Window films may cost as little as $7 or as much as $20. We research options at different price points to find quality window films for all budgets.
When researching films, we find out how easy the instructions are to follow.
It’s important for instructions to be clear so consumers don’t miss any important steps.
We look for window films that can be applied without concern for wayward bubbles and creases.
When looking at various products, we find out how quickly a window film dries in place and how long you should wait before touching it.
We think about how well a window film adheres to glass in certain weather conditions. Generally, it’s best to apply film on warm, mild days when there’s no chance of rain or humidity.
Window film prices
Adding film to your windows is a relatively inexpensive improvement that can easily pay for itself in enhanced comfort and style. Window film typically comes in rolls measuring approximately 17 x 80 inches that cost around $7 to $20 each.
Larger rolls of varying lengths and widths are available at a higher price. The total amount you will pay depends on the size and number of windows you wish to cover, as well as any other tools and supplies you need to purchase.
Expert tip
Check if you qualify for a tax rebate for larger-scale UV film projects.
BestReviews Home Improvement and DIY Expert
Tips
-
Read the instructions that come with your window film. Even if you’re pretty sure you know what you’re doing, you risk missing an important step that could affect the results if you don’t follow the application steps precisely.
-
Take your time. You might be excited to see the end result, but creating a seamless look that is free of bubbles and creases takes patience and a steady hand.
-
Gently work out bubbles. If bubbles form during the application process, gently work them to the edges of the film with a squeegee for a blemish-free finish.
-
Be prepared with extra supplies. If you have several windows to do, it’s a good idea to have a few extra supplies on hand. There’s a good chance you might need an additional spray bottle, squeegee, or more paper towels when tackling a big job.
- Allow the film to dry. Don’t touch the window glass for about a week, and avoid opening the window if possible.
FAQ
Q. How do weather conditions affect how well window film adheres to glass and what can I do to avoid problems?
A. Window film definitely has a tendency to adhere better in certain weather conditions. For example, it might dry more quickly than you can work out bubbles on a very hot day, or it might not stick at all if the weather is cold. Ideally, you’ll get the best results if you apply your film on warm, mild days when rain or humidity isn’t a factor.
Expert tip
A plastic ruler or credit card is also helpful for working out bubbles.
BestReviews Home Improvement and DIY Expert
Q. I don’t have very steady hands, but I’d like to give window film a try. What’s the best type for concealing mistakes made during application?
A. Try using film that has a texture or pattern, which is more likely to camouflage flaws such as lines or bubbles. Although you might end up with some imperfections, chances are they’ll blend in with the lines or designs that are already part of the film.
Q. I’d like to darken a room as much as possible. What should I look for when choosing the best window film to keep out sunlight?
A. While lots of types of window film will darken a room, some do a better job than others at making a room look darker in the daytime. Look for a film that indicates it is “blackout” or “light blocking” to achieve the best room-darkening results.